Tuesday, September 18, 2012

MAY 12 IN TWELVE TUTORIAL

Yes, a May tutorial in September.  I made this quilt for my granddaughter before we moved.  Hopefully, this one is worth the wait?

SERIOUSLY FUN QUILT


Have you ever wanted to try your hand at making a quilt, but think it’s too difficult a task?  Then you are going to love this project.  By purchasing a ready-made quilt in the size of your choice (available in most bed and bath departments for a bargain) you can make this appliqued beauty in a weekend.  Easy. Fun. Done.

Supplies
½ yard cotton quilt weight fabric for stripe
Cotton quilt weight fabric scraps for approx. 15 circles
1 yard lightweight fusible interfacing
Purchased ready-made cotton quilt in either twin, full/queen, or king size
Circular items for tracing circles in a variety of sizes
Sewing machine
Iron
Scissors
Cotton thread to match quilt color
Thread for basting
Hand sewing needle
Ruler
Pencil, pen or fabric marker
Pins

Let’s get started!

Making the Stripe

1   Cut the ½ yard fabric (18” x 44”) into three strips 6” x 44” each 


2   Sew the strips together end-to-end, right sides together, using a ½” seam allowance.  This will result in one strip 6” wide by about 131” long 


3   Press seams open.


4   Lay the long strip of fabric wrong side up.  Fold each long side ½” and press.  Press top of strip under ½”.  Finished strip will be 5” wide.


Set aside.

Making the Circles

5    Gather a variety of round dishes, saucers, drinking glasses, etc. to trace around for the circle patterns.  The circles on the quilt shown are anywhere between 2” to 8” for a total of 15 circles.  Hint: If you have a fabric with a printed pattern you’d like to center inside the circle then use clear glass, as you can see through it.
   
6      Trace around one of the circles onto the wrong side of a fabric.  Hint: Use larger circles for large prints, smaller circles for the smaller prints and solids.  Cut the traced circle out and pin it wrong side up to a piece of fusible interfacing fusible side up (bumpy side).  Pin and carefully sew all the way around on the traced line.  Cut a 1/8” seam.

7     Turn the circle over and cut a slit into the middle of the interfacing.


8     Pull the fabric through the cut slit in the interfacing.  Now you have a circle with the front of the fabric on the top-side and the fusible (bumpy) side of the interfacing underneath.   Finger press and voila!  Cool, huh?  Make the remaining circles.


Putting it all together

I designed this quilt so the long fabric strip and circles can lie either on the left
side or the right side of the bed by merely turning the quilt around and you can do the same.

9     The best way to begin placement is to lay the quilt on the bed and place the strip approximately 10” in from the edge of the bed.  Align the pressed top edge of the strip right under the binding of the quilt; pin in place.  Working from top to bottom start pinning both sides of the strip to the quilt, making sure to keep the strip straight.  Cut off any excess length of the strip left over at the bottom of the quilt, making sure to leave ½” to fold under right above the quilt binding; pin in place.   Baste stitch (large stitches) with a contrasting color thread ¼” in along the edge of both sides of the strip and remove pins.
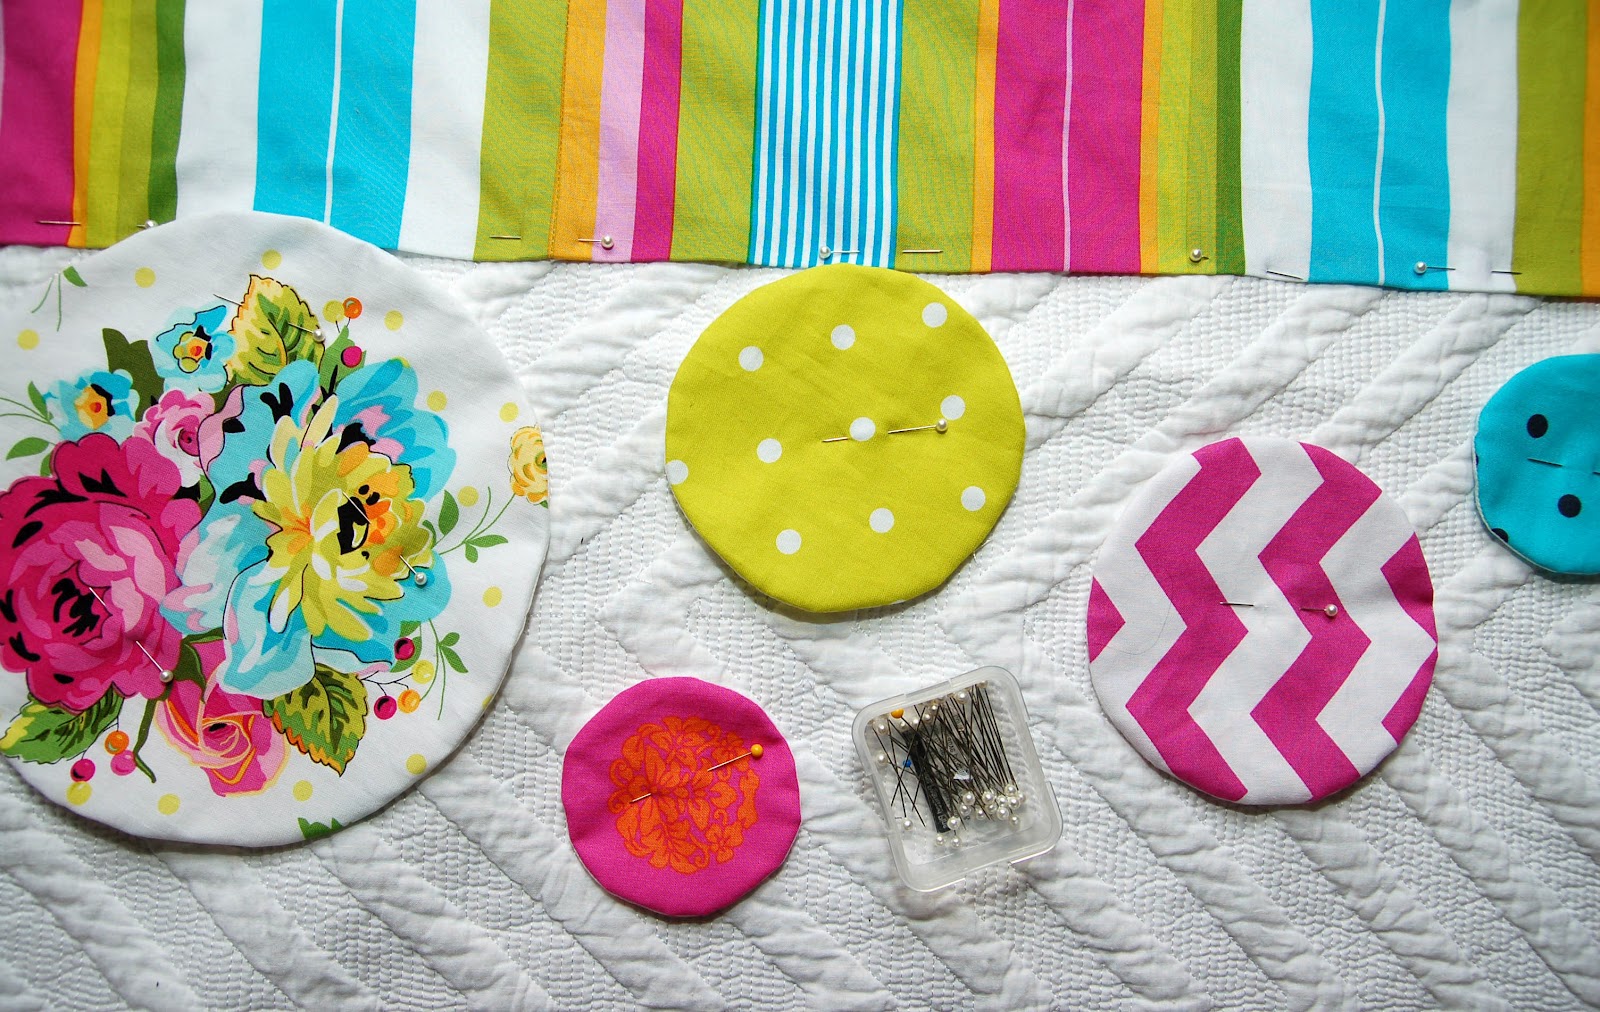

Lay the circles randomly along the inside edge of the strip and pin to the quilt. Either slip a board under the quilt on the bed or lay the quilt out on the floor to press the circles.  The iron setting should correspond with the fusible interfacing directions.  Remove pins before ironing each circle 


10    The final step is to hand applique the strip and circles using the amazing blind stitch technique (one of my personal favorites).  The stitches are almost invisible and one trick to achieving invisible stitches is to use a thread color that matches the color of the quilt exactly.  Normally, you would stitch by coming up through the back of the background fabric, but since you are appliqueing onto a finished quilt you can easily make all your stitches without going through the back of the quilt.  

Here’s how:

Choose a short hand-sewing needle, usually called “sharps”.  Thread the needle and knot one end of the thread.   Roll the edge of the applique back slightly, just enough to grab a bit of the quilt fabric with your needle without going all the way through to the backside, and pull the needle and thread until the knot stops.  The knot will be hidden underneath the applique edge.  Start the first stitch by letting your needle catch a few threads from the folded edge of the applique fabric.  Bring the needle back down directly opposite and take a tiny stitch from the quilt fabric just at the edge of the applique.  Slide the needle through along the inner edge of the applique and pull it out approximately 1/16” to 1/8” beyond where you went in.  The smaller the stitch is the better, as you want the stitch to disappear.


11   Continue taking tiny stitches until you have completed sewing the applique on.  Notice the circles will bubble up slightly, which I find quite desirable.  However, don’t pull the stitches too tightly to avoid puckering.   Knot the thread off very close to the applique.  Insert the needle in between the applique and the quilt at the knot and push the needle into the center of the applique about the length of the needle.  Pull the needle and thread up and out the top of the applique taut and snip the access thread close to the applique.  The thread poking up will instantly disappear.  Amazing, I know!  Remove any basting stitches and relish in your accomplishment.  


Monday, September 17, 2012

PLANE VIEW ABSTRACTS


I don't have a Bucket List yet, just some goals.  No, not jumping from a plane or even flying one, but there's a slight connection here.  I took the leap.  Yup, this is BIG.....I bought oil paints!!!  Wait, it doesn't stop there. Then there's the paint brushes, yada, yada and $450 later I had everything all laid out for a whole week, too scared to make the next move.  Just admired, stroked and envisioned myself painting plein air masterpieces in the South of France and Italy.  Okay, I guess that last part could go onto a Bucket List.  I decided to start with a small series of abstracts...another goal for me.  Hmm, where to start?  Okay, I love abstract, love patchwork and regularly take photos from the window of a plane.  That's it.  Let me introduce Plane View.


It was all about getting used to the huge difference between oils and my usual and more familiar acrylics.  And to continue my experiment with painting in abstract.  I did cover the base coat in acrylic because acrylics dry quickly.   I just went for it.  Definitely like some more than others (shhh, don't tell them I said that).  


Let the Learn Fest begin.  I signed up for an Alla Prima (wet on wet) oil painting class starting soon.  Goose bumps.

On another note, I have neglected the tutorials for the 12 in TWELVE.  They are quite time consuming and the house continues to undergo many projects, making it tough to to work in topsy turvy conditions on things that are worthwhile for you.  But, alas, I have a huge tutorial coming up tomorrow.   I hand painted the illustrations.  Whew, you'll see.  Hint: it's a quilt.

Thursday, September 6, 2012

STOP GASPING


We have proudly inherited this painting from Tim's family.  Thanks to Google, we have learned quite a bit about the artist and his other works.  It has some slight damage and REALLY needs a good cleaning.  I'm itching to clean it myself.  I know, I know, I can hear the gasps.  The coating of "age" finally got the best of me so I lightly rubbed an ever so slightly damp cloth to the upper left corner.  I felt an invisible slap on my back of my hand.  The wrongness of my behavior was conflicted with the excitement of revealing the more vibrant aqua blue sky underneath.  Can you see the difference?  To bring my guilt up a few notches this story about a lady who decided to restore this priceless 19th century fresco of Jesus came out.  If you haven't seen this story it was all over the news and you must take a minute to watch...absolutely entertaining.  When Tim saw it he started laughing and couldn't stop. It was a Jeff Lewis (from Flipping Out) kind of laugh. 


Okay, so I took it as a sign from above and scheduled an appointment with an art restoration company here in San Diego.  He promptly verbally slapped my hand for my part in adding to the demise of this masterpiece, then slapped me with a quote of $1500 to do it himself.  So do you ever feel you should have chosen a different career path?  I go through those thoughts every time I choose a pair of eyeglass frames.  Anyway, just so I don't make the national news I have temporarily hung the painting.  Figured if the before of this famous fresco hung in a Spanish church for a couple hundred years and it's condition only bothered one poor soul, I can live with mine a bit longer as I save my pennies.  

Tuesday, August 28, 2012

NANCY ROSE

  
Remember my friend Nancy?  I simply adore her.  She was my neighbor in Carmel, IN.  Oh. a side note: Carmel IN was recently voted the best town to live in right now.  Here to say they do not lie; it's an awesome place to live filled with lots of people like Nancy.  Anyway, her middle name is Rose and her birthday is July 5th.  Her favorite colors are red and blue and her style is country french.  I know all this because I was her interior designer.  The one area I never completed was a very cool cubby in the great room that needed just the right artwork so we just hung a blue and white plate up there....a few years ago.  But alas, I just painted this vase of roses for her birthday and hand delivered it to her.  I didn't actually have this coveted vase or the roses in front of me...just made it up.  


Yes, she is just as beautiful on the inside.  So I was able to accompany her to the framers but missed seeing the finished piece so she sent this photo of how it looks it it's new location.   


It took a few years but I finally found the perfect piece of artwork, right?

Monday, August 27, 2012

MISSING IN ACTION


No, I didn't fall off the face of the earth and I'm not in a witness protection program.  I have been painting the summer away.  I have now painted the majority of the main level of the house from top to bottom while Tim has been installing the wood flooring, replacing baseboards and updating electrical, just to name a few projects.  The one thing I couldn't bring myself to paint, er... repaint, is the garage door.   Tim relieved me of the task and I avoid even looking at the "unofficial" clone tan by clicking on the door opener as I round the corner.  Up it goes, I slide in and close it behind me (it is a common practice here anyway).  And who says color is not emotional?

I have been painting interiors most of my life and must say it's getting old.  Truth is I do it better and cheaper.  Just when I thought I was ready to throw in the brush...I mean towel, I was able to escape an spend time with friends and family.  In May/June we met friends Jerry and Lisa in Kauai, Hawaii.  All the pics of Lisa and I turned out much like my past trip to Hawaii where hair is either in your face or blown straight upward.  Remember this past photo of me impersonating Nick Nolte?   Why was my hair glowing orange? Anyway I have plenty new Nolte look-alike photos that I'll skip for now.

I was able to get a few other shots that represent the beauty everywhere.


Hanalei Bay
Patchwork Farm
How Coy

How the birthday boy spent his day

Bike Ballet

View from our lanai
Below is a photo of the Lihue Lutheran Church which has special meaning to my friend Lisa; as one of her past relatives (a German immigrant) helped build in 1885.  The 6 month trip on board the ship around Cape Horn is reflected in the architecture.  The floor slants like the deck of a ship; the balcony is the captain’s bridge; the ceiling is like the hull; the lights are ship lanterns; and the pulpit the forecastle.  It burned to the ground and has since been rebuilt, trying to keep as much of the original.  


Lihue Lutheran Church

So as a gift for the invite and the MANY other blessings Lisa has bestowed on me and my family I painted this for her.  I usually prefer exaggerating colors and contrast, but made a decision to paint it just as we captured it that day.


Lihue Lutheran Church by Paula Prass


I find that I do much better painting what I see so this wasn't difficult, just detailed.  Abstract is still hurting my brain. I have been working in acrylics but am going to try oils soon...yikes!

Guess it's been way too easy to become reclusive here behind that garage door.  Promise to put the brush down to spend more time with you.  Thank you so much to those who have emailed to check on me.  It means more than you know, trust me.  

Friday, May 11, 2012

HAPPY AND GRUMPY ARE MY FRIENDS


Okay, now that the new floors are down in the living and family rooms I am getting excited about moving towards some designing.  Here is what I've come up with for the family room.  I must tell you that we found the area rug last weekend at Home Goods.  However there was another couple already expressing interest in it.  They walked off (probably because we were hovering) and my bad self wanted to snatch it up, but my gooder self won over and we waited to see what they would do.  They bought it.  I was quite disappointed, esp. after checking the rug out online.  Well, my awesome husband had to drive up to LA on business this week and on his way back he stopped at 4 Home Goods stores and finally found another rug.  I know, please don't hate me.  He did that totally on his own, he's that kind of guy.  The best thing is that it's an indoor/outdoor rug, yet doesn't look or feel outdoorish at all. No wait, THE BEST THING is that it was $100 less than the websites were charging for the same rug.  Happy dance.


When Jennifer and the kiddos were here for Spring Break last month we had an art day together.  I started this painting of Tim, Wyatt and Amelia at the beach, but that's as far as I got.  I see that it might just have a promising future in the family room and am excited to finish it along with some seascapes.  I confess I am one that likes my art to match the sofa.  Shocker, huh?


My need for nesting is taking a front seat lately.  That's a good sign that I might be getting back to my old self.  Finally not obsessing about the exterior paint colors so much.  Ask me why.   Okay, because our next door neighbors are having their house re-stuccoed, painted and tile roof removed, repaired and replaced.  Why should that matter?  Well, we recently spent a weekend cleaning up our courtyard of the piles of crap the prior owners left us.  After hauling away broken pots, dead plants, etc. we washed the windows, bought new planters and flowers and by Sunday eve celebrated our accomplishments.   Seriously, the very next day the workers set up shop in our courtyard.  Because we are all on top of each other here my courtyard became a staging area for roof tiles, scaffolding and equipment.  What we have right now is trampled ground covers, a couple broken things and layers upon layers of sand, grit and overspray.  Just when I thought to sneak a photo from the living room of all the chaos and people, they had just removed the large scaffolding and tarps off my greenery.  You can't see much through my filthy windows and narrow view but there are 6 very boisterous people and loud machinery all in my tiny courtyard. CRAZY.  It's no one's fault and I'm happy to have neighbors fixing up, just can't wait until I can reclaim my space and privacy.   I sound old and grumpy today...I AM, okay?!


Finally, I wanted to thank you all for your great comments on my last post.  I got a few interesting suggestions, in fact, here is one from Funky Kim.  It makes me smile, but don't think the neighbors would have the same reaction.

Wednesday, May 2, 2012

THE LAND OF LOONEY

Since I last posted: another painting, another birthday.  Yup, I've been busy.  First, the painting.  Told you I was obsessed with ranunculus lately.  And to think just a few months ago I couldn't even spell the word.  Photos are dark due to our May Gray/June Gloom.


I know I've said it before, but I sure do enjoy getting back into painting on a regular basis.  Anticipating what I want to do next, but absolutely must get some long overdue projects completed.  We have torn out the disgusting carpet on the first floor and installed hardwood in several areas.  Oh, what a wonderful change.  This place is beginning to feel like ours.  My studio is completely torn up though and I am in the middle of painting the living room, entry and hallway before I can get to the studio.  So I'm back to painting where I shouldn't be and we are back to eating at the coffee table.


Then I had me another one of them there birthdays.  I guess that's better than the alternative.  I was in the midst of wallowing in a vat of sadness leading up to that day because moving here hasn't always been easy for me.  Here's the story about why I was in such a terrible funk leading up to my birthday.  Fair warning: if you don't want to hear my sob story just skip to the last paragraph.  This is my journal and it includes all things Paula; the good, the bad and everything in between.


Okay, so remember the garage door I posted about here?   Here's a closeup reminder of the before for the visual drama.  Promise.  That is exactly what it looked like before.  No joke.

ACCEPTABLE old paint color(s)

So, guess what?  We have to repaint.  Yup.  Not just the garage door but we had been scraping and painting ALL the trim because it was as bad as the above photo.  Unfortunate for us, we asked the only neighbors we knew on either side of us if there were color palettes to choose from for the neighborhood.  We were told no, which is a true statement.  However, we failed to ask enough questions to know we were required to submit our color choices for approval by the HOA.  The day we got "the letter" we also went to a small gathering, excited to finally meet some new neighbors.  Just about everyone we introduced ourselves to said, "So you are the people with the garage door".  One lady referred to it as "unique".  I told her I wasn't sure how to take that, as unique isn't always meant as a compliment, and I sensed she didn't intend for it to be taken as such.  She didn't change her attitude and restated that it was indeed unique.  Turns out they live two doors away and her husband is on the board, as were many of the others at that small gathering.  Scratching my head after that little event I googled the title on the header of the letter and found the rules on their website.  That prompted us to dig deeper and finally found the rules buried within 164 pages we received upon closing on this place.  We went through the required hoops but as I suspected, the decision had already been made. 


Apparently, the old color was much less offensive, or at least that's what I heard in my deeply rejected state of mind.  I took this very hard.  My life revolves around color.  I thank God constantly for color and I'm not exaggerating either!  I hold high mass over my color choices because I believe our personal colors reflect who we are.  So to reject my color choice is the same as rejecting me.  I immediately found myself wandering around in the Land of Looney.  All those years of being an interior designer, all the awards, the national publications featuring my designs, sitting on the board of directors for the American Society of Interior Designers (ASID) in Indiana; all flushed down the toilet.  Not really, but that's what happens when I go to that forbidden place.  I thought the old paint was hideous, but my color choice was worse!  Sob. In reality I do get the point, just wish there had been a more neighborly way to go about it.  Thank goodness Tim never visits the Land of Looney with me and was just happy they weren't making us remove the new garage door, which they could have done.  In the meantime I AM working on the Love Thy Neighbor thing.  I'm dragging my feet, but I'll get there.

UNACCEPTABLE  new paint color


Now, back to my birthday.  I received several phone calls and emails from friends and grandkids back in Indiana and Tennessee from morning till night.  It was just glorious to laugh and chat with the people in my life that really know me, accept me and can instantly pull me out of that nasty place.   


Look at this flower cake I received from a dear friend back in Indiana...because she knows I love flowers even more than cake.  I am welling up just thinking about it.  She even wanted the lime slices on the top because I love lemons and limes.  I had a day filled with friends, family, love, a little color and perfect timing.  


Monday, April 23, 2012

APRIL 12 IN TWELVE TUTORIAL


GOT YOUR NUMBER CHAIRS


Assigned seating never looked so good.  Turn a slipcovered chair into a designer chair before dinnertime.   I chose parsons chairs with ready-made slipcovers (these were from World Market and slipcovers were sold separately.  This is truly a no sew project.  How cool is that?  As I explained in the tutorial for the napkins I chose Sealah Adhesive Sheets to apply the numbers because it is an industrial strength adhesive that is transparent, washable, and has other pleasing properties for projects such as these appliqués. 

Supplies


1 Sealah Adhesive Sheet per number or letter or heavy weight double-sided iron-on adhesive
Iron and ironing board (optional)
X-ACTO knife
Cutting mat
Ruler or measuring tape
100% cotton fabric 6” x 11 ½” piece per number or letter


Let's Get Started

Notes: I have provided a step-by-step tutorial on the March 12 in Twelve Tutorial: Got Your Number Napkins.  Go take a look at steps 11 through 17 for details, then come back and get your numbers on.

Also, I realized it would have been much easier to measure with the slipcovers on the chairs.  In fact, if you are using the Sealah sheets and choose not to iron press the numbers you could do this entire project right onto the chair back.  

My numbers were 8" high, but push your chair up to the table to determine how high and large you want the number.


1     I used Photoshop to select a number font.  Make sure the number is reversed (mirror image) and resize to desired height.  Plan to fit each number inside a 6” x 11 ½” space (which is the size of the Sealah Sheets).
2     Print out the reversed number on copy paper and tape it onto the white side of the Sealah Sheet at several places to prevent the number from shifting.
3     Cut a piece of the fabric for the numbers the same size as the Sealah Sheet.
4     Turn the Sealah Sheet over so the orange side is facing up.  Begin peeling the orange backing off the Sealah Sheet and carefully place the fabric over the adhesive.
5     Using a new, sharp X-ACTO knife blade and a cutting mat carefully cut along the edge of the number.  You will be cutting through a few layers so you will most likely need to go over an area twice to get a clean cut.  Make sure to use a new blade as this minimizes fraying of the fabric.
6     Determine how high you want the number, then measure from left to right.  Make light marks that will be covered by the number (Diagram 1)

Diagram 1

7     Remove the orange backing.  The adhesive is quite sticky so be ready to place with minimal touching.  (Diagram 2)

Diagram 2

8     You can cure the adhesive even quicker by pressing with a warm iron, but not necessary.  (Diagram 3)

Diagram 3


FLOWER FIELDS FOREVER

It is no surprise that I have a love affair with flowers.  I have my usual favorites, but more recently I've fallen head over heels for ranunculus.  Just so happens The Flower Fields in Carlsbad have acres in bloom right now.  I had no idea what to expect.  It quickly became clear as we got closer that this must be the tenth wonder of the world.  Finding parking was near impossible and the sheer number of people there from around the world made me unsure of how much I really needed to follow through with this idea.  Apparently the Red Hat Society converged for a worldwide meeting, or so it seemed.  Never saw so much red and purple in my life.  But once I saw the fields all the stress and craziness became secondary to the amazing beauty.  I took enough photos to produce a lifetime of paintings.  Here are just a few images. 


I went for a wide range of photos from rows as far as the eye can see to clusters to closeup.  So many more colors, but I don't want to overwhelm you.  Those are condos; can you image that view?  It might be balanced by the hoards of people, and traffic, I'm sure


These are for my followers viewing pleasure and I want you to enjoy them.  However, please don't take them for your personal use.  Thank you. 

Tuesday, April 3, 2012

SPRING BREAK


Flowers from the yard are adorning the house.  I just realized that I have not taken photos of my new Demdaco line as I was taking this photo of the tray.  I'll just need to take more photos later.  Not now because Jennifer and the kiddos are here for Spring break!  The weather is beautiful and we are taking full advantage. 

My two favorite guys heading in

LinkWithin

Related Posts with Thumbnails