Yes, a May tutorial in September. I made this quilt for my granddaughter before we moved. Hopefully, this one is worth the wait?
SERIOUSLY FUN QUILT
Have you ever wanted to try your hand at making a quilt,
but think it’s too difficult a task?
Then you are going to love this project.
By purchasing a ready-made quilt in the size of your choice (available
in most bed and bath departments for a bargain) you can make this appliqued
beauty in a weekend. Easy. Fun. Done.
Supplies
½ yard cotton quilt weight fabric for stripe
Cotton quilt weight fabric scraps for approx. 15 circles
1 yard lightweight fusible interfacing
Purchased ready-made cotton quilt in either twin, full/queen,
or king size
Circular items for tracing circles in a variety of sizes
Sewing machine
Iron
Scissors
Cotton thread to match quilt color
Thread for basting
Hand sewing needle
Ruler
Pencil, pen or fabric marker
Pins
Let’s get started!
Making the Stripe
1 Cut
the ½ yard fabric (18” x 44”) into three strips 6” x 44” each
2 Sew the strips together end-to-end, right
sides together, using a ½” seam allowance.
This will result in one strip 6” wide by about 131” long
3 Press
seams open.
4 Lay the long strip of fabric wrong side
up. Fold each long side ½” and
press. Press top of strip under ½”. Finished strip will be 5” wide.
Set aside.
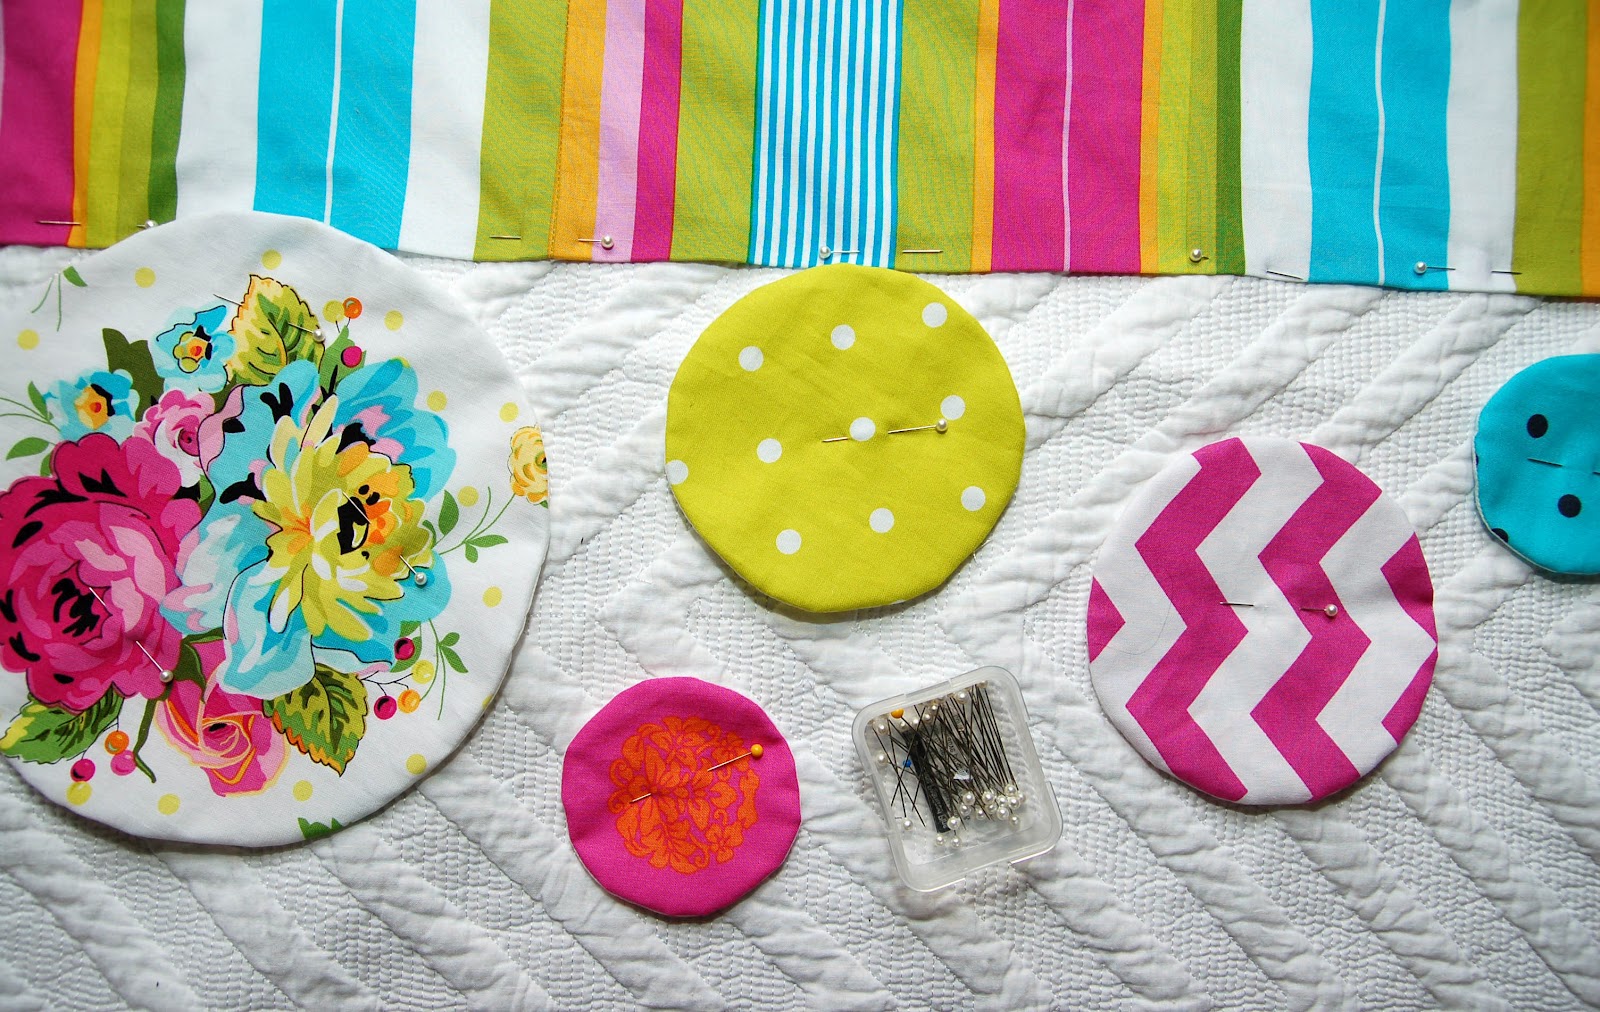
Making the Circles
5 Gather a variety of round dishes, saucers,
drinking glasses, etc. to trace around for the circle patterns. The circles on the quilt shown are anywhere
between 2” to 8” for a total of 15 circles.
Hint: If you have a fabric with a printed pattern you’d like to center
inside the circle then use clear glass, as you can see through it.
6 Trace around one of the circles
onto the wrong side of a fabric. Hint:
Use larger circles for large prints, smaller circles for the smaller prints and
solids. Cut the traced circle out and
pin it wrong side up to a piece of fusible interfacing fusible side up (bumpy
side). Pin and carefully sew all the way
around on the traced line. Cut a 1/8”
seam.
7 Turn
the circle over and cut a slit into the middle of the interfacing.
8 Pull
the fabric through the cut slit in the interfacing. Now you have a circle with the front of the
fabric on the top-side and the fusible (bumpy) side of the interfacing
underneath. Finger press and
voila! Cool, huh? Make the remaining circles.
Putting it all together
I designed this quilt so the long fabric strip and
circles can lie either on the left
side or the right side of the bed by merely
turning the quilt around and you can do the same.
9 The
best way to begin placement is to lay the quilt on the bed and place the strip
approximately 10” in from the edge of the bed. Align the pressed top edge of the strip right
under the binding of the quilt; pin in place.
Working from top to bottom start pinning both sides of the strip to the
quilt, making sure to keep the strip straight.
Cut off any excess length of the strip left over at the bottom of the
quilt, making sure to leave ½” to fold under right above the quilt binding; pin
in place. Baste
stitch (large stitches) with a
contrasting color thread ¼” in along the edge of both sides of the strip and
remove pins.
Lay the circles randomly along the inside edge of
the strip and pin to the quilt. Either
slip a board under the quilt on the bed or lay the quilt out on the floor to
press the circles. The iron setting should
correspond with the fusible interfacing directions. Remove pins before ironing each circle
10 The final step is to hand applique the
strip and circles using the amazing blind
stitch technique (one of my personal favorites). The stitches are almost invisible and one
trick to achieving invisible stitches is to use a thread color that matches the
color of the quilt exactly. Normally,
you would stitch by coming up through the back of the background fabric, but
since you are appliqueing onto a finished quilt you can easily make all your
stitches without going through the back of the quilt.
Here’s how:
Choose
a short hand-sewing needle, usually called “sharps”. Thread the needle and knot one end of the
thread. Roll the edge of the applique back slightly, just
enough to grab a bit of the quilt fabric with your needle without going all the
way through to the backside, and pull the needle and thread until the knot
stops. The knot will be hidden
underneath the applique edge. Start the
first stitch by letting your needle catch a few threads from the folded edge of
the applique fabric. Bring the needle
back down directly opposite and take a tiny stitch from the quilt fabric just
at the edge of the applique. Slide the
needle through along the inner edge of the applique and pull it out approximately
1/16” to 1/8” beyond where you went in. The
smaller the stitch is the better, as you want the stitch to disappear.

11
Continue taking tiny stitches until you have completed sewing the
applique on. Notice the circles will
bubble up slightly, which I find quite desirable. However, don’t pull the stitches too tightly
to avoid puckering. Knot the thread off
very close to the applique. Insert the
needle in between the applique and the quilt at the knot and push the needle into
the center of the applique about the length of the needle. Pull the needle and thread up and out the top
of the applique taut and snip the access thread close to the applique. The thread poking up will instantly
disappear. Amazing, I know! Remove any basting stitches and relish in your
accomplishment.


 What a glorious ride home as the sky was filled with cotton clouds in the rear view mirror and low, dark ones in front. As it started to rain rainbows appeared on the interstate floor. It was something I never experienced before and wanted to take pics as proof, but didn't dare take my hands off the wheel, as I don't trust anyone around me that rarely drives in rain. When Tim got home he showed me a pic he took on the interstate of TWO rainbows in the sky side-by-side! It was an amazing day and anyone you spoke with mentioned the clouds and rain. Please, it was only 1/4" at best, but glorious all the same.